Installing Selenium & Docker on a Virtual Private Server in 2026
September 21, 2023 | By David Selden-Treiman | Filed in: hosting.If you’re looking to install Selenium to run either a web crawler or set up a testing environment, this guide’s for you.
Start By Getting a Virtual Private Server
To begin with, we will need a virtual private server. Personally, I recommend going with either Digital Ocean, or Hetzner (affiliate links). At Potent Pages, we have dozens of VPS’s, and we have had the best experience with these two providers.
To set up your VPS, head on over to your hosting provider. Follow their instructions to add in a new virtual private server.
When you select your operating system, we’re going with Ubuntu for this guide. We won’t need a very big VPS, just large enough to run a web browser for the most part. Think 1 gig of RAM and one CPU core. You can get one that’s larger of course, but this is the minimum.
As far as the other settings go, you will need an IP address that you can connect to. We will be using an IPv4 address, but theoretically you could also use an IPv6 one instead.
Firewall
When it’s set up, you’ll also need to enable some ports on your firewall. Make sure port 22 is enabled for SSH. You’ll also want to enable port 4444 with inbound access permitted on your IP address that you’ll be connecting from.
SSH Into Your VPS and Update the Server
Now that that’s set up, make sure that you can SSH into your machine. The exact instructions may depend on whatever hosting provider you’re using. However, on digital ocean and hetzner, you upload your public SSH key when creating your vps. Then, you connect using the root user at the IP address they give you.
You may be asked if the SSH key is ok the first time you log in. If that’s the case, type yes, and you should be able to log in.
Now that that’s done, you’re going to want to make sure that the machine is up to date. To do this, you’ll want to run:
sudo apt update
sudo apt upgrade -y
This might take a bit of time to complete.
Installing Docker
To install Docker, we’ll want to use the following instructions for setting up docker compose. The official instructions are here: https://docs.docker.com/engine/install/ubuntu/#install-using-the-repository .
I recommend literally copying and pasting these instructions into your terminal (usually it’s CTRL+SHIFT+V for pasting).
To start with, we’ll install a couple packages to download and install the Docker GPG key.
# Add Docker's official GPG key:
sudo apt-get install ca-certificates curl gnupg
sudo install -m 0755 -d /etc/apt/keyrings
curl -fsSL https://download.docker.com/linux/ubuntu/gpg | sudo gpg --dearmor -o /etc/apt/keyrings/docker.gpg
sudo chmod a+r /etc/apt/keyrings/docker.gpg
Next we’ll want to add the Docker repository to our apt sources. This will allow for easy installation and updating:
# Add the repository to Apt sources:
echo \
  "deb [arch="$(dpkg --print-architecture)" signed-by=/etc/apt/keyrings/docker.gpg] https://download.docker.com/linux/ubuntu \
  "$(. /etc/os-release && echo "$VERSION_CODENAME")" stable" | \
  sudo tee /etc/apt/sources.list.d/docker.list > /dev/null
sudo apt-get update
Finally, we can install the Docker packages:
sudo apt-get install docker-ce docker-ce-cli containerd.io docker-buildx-plugin docker-compose-plugin docker-composeYou can test the Docker installation by running:
sudo docker run hello-worldInstalling Selenium Grid Using Docker Compose
We’re going to install Selenium grid next using Docker compose. You’re going to want to create a new folder for your docker-compose.yml file. I usually put mine in this folder (/opt/selenium). You can create this folder with the following command:
mkdir -p /opt/selenium;Next, you’ll want to copy and paste the following text into a docker-compose.yml file in the selenium folder. You can change the settings as you’d like. For example, if you want more sessions available, you can change the max sessions setting.
# To execute this docker-compose yml file use `docker-compose -f docker-compose-v2.yml up`
# Add the `-d` flag at the end for detached execution
# To stop the execution, hit Ctrl+C, and then `docker-compose -f docker-compose-v2.yml down`
version: '2'
services:
  chrome:
    image: selenium/node-chrome:4.2.2-20220609
    shm_size: 2gb
    depends_on:
      - selenium-hub
    environment:
      - SE_EVENT_BUS_HOST=selenium-hub
      - SE_EVENT_BUS_PUBLISH_PORT=4442
      - SE_EVENT_BUS_SUBSCRIBE_PORT=4443
      - SE_NODE_MAX_SESSIONS=1
      - SE_NODE_OVERRIDE_MAX_SESSIONS=true
    ports:
      - "6900:5900"

  edge:
    image: selenium/node-edge:4.2.2-20220609
    shm_size: 2gb
    depends_on:
      - selenium-hub
    environment:
      - SE_EVENT_BUS_HOST=selenium-hub
      - SE_EVENT_BUS_PUBLISH_PORT=4442
      - SE_EVENT_BUS_SUBSCRIBE_PORT=4443
      - SE_NODE_MAX_SESSIONS=1
      - SE_NODE_OVERRIDE_MAX_SESSIONS=true
    ports:
      - "6901:5900"

  firefox:
    image: selenium/node-firefox:4.2.2-20220609
    shm_size: 2gb
    depends_on:
      - selenium-hub
    environment:
      - SE_EVENT_BUS_HOST=selenium-hub
      - SE_EVENT_BUS_PUBLISH_PORT=4442
      - SE_EVENT_BUS_SUBSCRIBE_PORT=4443
      - SE_NODE_MAX_SESSIONS=1
      - SE_NODE_OVERRIDE_MAX_SESSIONS=true
    ports:
      - "6902:5900"

  selenium-hub:
    image: selenium/hub:4.2.2-20220609
    ports:
      - "4442:4442"
      - "4443:4443"
      - "4444:4444"
You’ll want to create a file with your favorite terminal-based text editor. I’ll be using nano here. To do this, run:
cd /opt/selenium/ && nano docker-compose.yml;Copy and paste in the docker-compose file (again, that’s CTRL or CMD + SHIFT + V).
Next, we can start selenium grid. We can run this command to start the Selenium grid containers.
docker-compose up -dRunning this command will show you the state of your selenium grid containers:
docker-compose psTesting
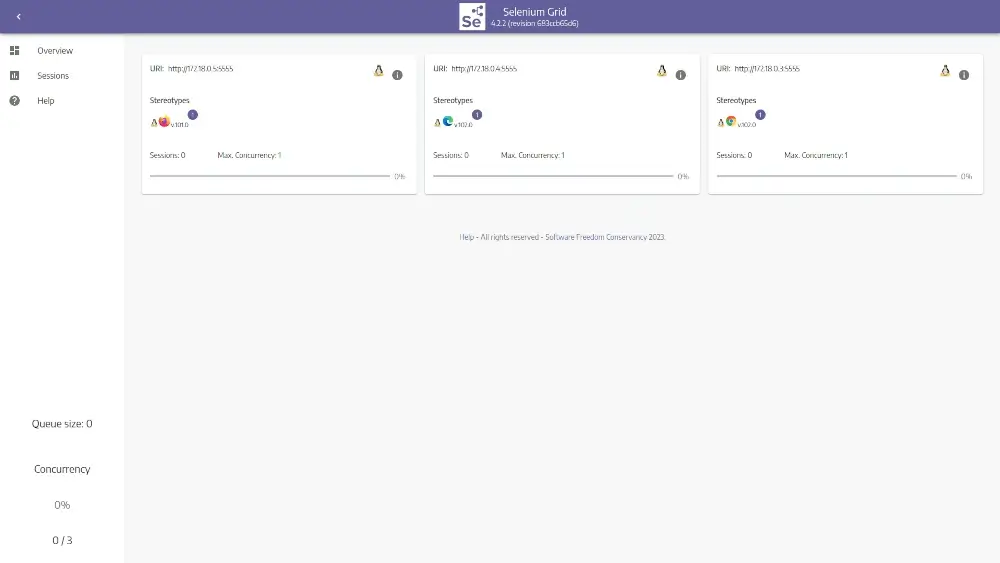
At this point, if you go to [your VPS’s IP address]:4444 in your browser, you should see a screen that looks something like this.

Complete
At this point, you should be all good to go. You can point your Selenium settings to your new VPS.

David Selden-Treiman is Director of Operations and a project manager at Potent Pages. He specializes in custom web crawler development, website optimization, server management, web application development, and custom programming. Working at Potent Pages since 2012 and programming since 2003, David has extensive expertise solving problems using programming for dozens of clients. He also has extensive experience managing and optimizing servers, managing dozens of servers for both Potent Pages and other clients.

Comments are closed here.